MTK Devices Porting Zawgyi Font to System without Root Tutorial
MTK Devices Porting Zawgyi Font to System without Root Tutorial
မဂၤလာပါခဗ်ာ။ဒီတစ္ခါ MTK CPUs သံုးထားတဲ ့ဘာအမ်ိုးအမည္မွန္း မသိရတဲ့ ဖုန္းေတြမွာ Root ေဖာက္မရခဲ့ရင္ေသာ္လည္းေကာင္း၊ အေၾကာင့္အမ်ိဳးမ်ိဳးေၾကာင့္ Firmware က်သြားမွာကို စုိးရိမ္ေသာေၾကာင့္လည္းေကာင္း၊ font style လဲေျပာင္းမရ၊ Firmware လဲရွာမရ၊ Android Version ကလဲ 6.0 ျဖစ္၊ ဘာလုပ္လုိ ့လုပ္ရမွန္းမသိျဖစ္ေနရင္ ဒီနည္းေလးနဲ ့ျမန္မာ ေဇာ္ဂ်ီေဖာင့္ကို ထည့္လုိ ့ရပါေၾကာင္း..။ အဆင့္ေတြ မ်ားတဲ ့အတြက္ တစ္ဆင့္ျခင္းေသခ်ာ ဖတ္ရႈေပးပါရန္ ေမတၱာရပ္ခံအပ္ပါသည္။ :P
Hello Everyone!!
This time, I've some idea to editing system.img for some MTK devices that can't be rooted by OneClick or InsecureBoot or any other method. Please try to understand and take a look each post and each steps carefully!! Let's do this!!
၁.ပထမဆံုး ဖုန္းကို Firmware ကို Backup ထုတ္ရပါမယ္။ ဘယ္လုိ နည္းလမ္းနဲ ့ပဲ ထုတ္ထုတ္ ကိုယ္အဆင္ေျပရာ နည္းနဲ ့ထုတ္ယူလုိ ့ရပါတယ္။ MTK Firmware Backup အတြက္ ေထြေထြထူးထူး ရွင္းျပမေနေတာ့ဘူးေနာ ့။ အဆင္ေျပသလုိ ထုတ္ၾကေပါ့ဗ်ာ။
1.Firstly, You have to backup device's firmware. In case, you can use any method of ReadBack MTK roms.
၂.ထုတ္ျပီးရလာတဲ ့Firmware ထဲက System.img ကို Copy လုပ္ပါ။ ျပီးရင္ Edit လုပ္မွာျဖစ္တဲ ့အတြက္ folder အသစ္တစ္ခုေဆာက္ျပီး ထည့္ထားလုိက္ပါ။
2.When you get firmware, copy the "system.img" and place with new folder,whatever you name it.
၃.ျပီးလွ်င္ Backup ထုတ္ထားတဲ ့folder ထဲက boot.img ကိုလည္း ျဖည္ခ်ပါ။ သူ ့ကုိ ျဖည္ဖုိ ့အတြက္ Android_image_kitchen ကိုေဒါင္းပါ။
3.And also extract boot.img form your backup firmware folder. To do this, you have to download "Android_image_kitchen" given below.
Download Android_image_kitchen - http://gsurl.in/5saL
၄.ျပီးရင္ Android_image_kitchen ကို ျဖည္ခ်ျပီး folder ထဲမွာ အေစာက boot.img ကုိထားပါ။ boot.img ကို folder ထဲက unpacking.bat ဆုိတဲ့ဖုိင္ေပၚ ဆဲြတင္လိုက္ရင္ Auto ျဖည္ခ်ေပးပါလိမ့္မယ္။ ေအာက္ကပံုထဲကလို ေပၚလာပါလိမ့္မယ္။
4.After downloading Android_image_kitchen, extract somewhere on desktop and place boot.img in that folder. And drag and drop boot.img on to the file "unpacking.bat". This will extract your boot.img to "ramdisk" and "split_img" as shown in figure.

5.Open "ramdisk" folder and copy "file_contexts" to the folder which you created in step 2, system.img in the folder together.
၆.ျပီးရင္ Unpack/Repack Tool ေဒါင္းရပါမယ္။ Thailand က Developers ေတြ ေရးသားထားတဲ ့System.img && System.new.dat Unpack and Repack လုပ္လုိ ့ရတဲ ့Tool ေလးပါ။ ကုိယ့္စက္ရဲ ့windows ေပၚမူတည္ျပိး ေဒါင္းပါ။
6.Download "Unpack/Repack Tool" form below. These tools are developed by Thailand Developers to unpack and repack system.img && system.new.dat for lastly MTK devices. You have to download depend upon your PC's Windows version.
Download Unpack/Repack System IMG/DAT for Windows 64bit-http://gsurl.in/5saW
Download Unpack/Repack System IMG/DAT for Windows 32bit-http://bit.ly/2wKRgmj or -http://gsurl.in/5sb4
၇.ေဒါင္းျပီးရင္ ဖုိင္ကို ျဖည္ခ်ထားပါ။ ဖုိင္ထဲက Auto Tool v3.0 .exe ဖိုင္ကို Run ပါ။ (AntiVirus ပိတ္ထားဖုိ ့လိုပါမယ္) ထုိ ့ေနာက္ နံပတ္ 4. ကိုရိုက္ေပးျပီး Enter ေခါက္ပါ။ Folder တစ္ခုပြင့္ပါလိမ့္မယ္။ အဲ့ထဲကုိ Backup ယူထားတဲ ့Firmware Folder ကေန Copy လုပ္ျပီး သိမ္းထားတဲ ့System.img ႏွင့္ file_contexts ကို ကူးထည့္ေပးပါ။
7.After download, extract the tool and run "Auto Tool v3.0.exe"( You may have to close AntiVirus softwares). Then you have to type "4" and Enter. A new folder will open and you have to move "system.img and file_contexts" ,saved above steps, to that folder.


၈.ကူျပီးသြားရင္ အေစာက Unpack/Repack Tool Command windows မွာ Enter ထပ္ႏွိပ္ပါ။ အလုပ္လုပ္ေနပါလိမ့္မယ္။ ခဏေလးေစာင့္ေပးပါ။ ျပီးသြားရင္ ေအာက္က ပံုလုိ ေပၚလာပါလိမ့္မယ္။
8.After move "system.img and file_contexts" to the folder, you have to press ENTER in Tool cmd Windows.

When you see this screen, press ENTER again and the Tool will continue to extract system.img. Tool will show as following picture when it finished.
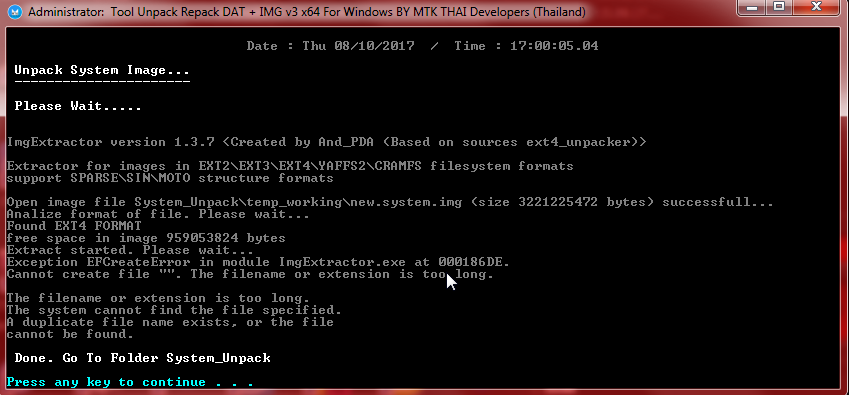
When you get this, press ENTER again and the Tool will appear Main Menu. You will find extracted system_ files under Tools's "system_unpack" folder.
၉.အဲ့ဖုိင္ေတြထဲက fonts folder ထဲကို၀င္ပါ။ Android 6.0 ေတြမွာ ေအာက္ပါနာမည္နဲ ့ေဖာင့္ဖုိင္ ၄ခုကို လဲေပးရပါမယ္။ လဲဖုိ ့အတြက္ ေဇာ္ဂ်ီေဖာင့္ဖုိင္ကို ယခု system/fonts ေအာက္မွာရွိတဲ့ ဖုိင္ ၄ ဖုိင္နဲ ့နာမည္တူေအာင္ ေျပာင္းထားဖို ့လုိပါတယ္။ ျပိးရင္ copy/paste လုပ္ျပီး ဖုိင္ေတြ ကို replace လုပ္ေပးပါ။ ေျပာင္းရမယ့္ဖုိင္ေတြကို နာမည္ေရးေပးထားပါတယ္။
NotoSansMyanmar-Bold.ttf
NotoSansMyanmar-Regular.ttf
NotoSansMyanmarUI-Bold.ttf
NotoSansMyanmarUI-Regular.ttf
မွတ္ခ်က္။ ။ Android Version 6.0 MTK ေတြမွာ အျဖစ္မ်ားလုိ ့6.0 ကေဖာင့္ေတြနဲ ့ပဲျပထားပါတယ္။
9.This step is changing Zawgyi Myanmar fonts and system original fonts. Especially for Android 6.0 and above, following font files must be replaced with "zawgyi.ttf" which you need to rename such as :
NotoSansMyanmar-Bold.ttf
NotoSansMyanmar-Regular.ttf
NotoSansMyanmarUI-Bold.ttf
NotoSansMyanmarUI-Regular.ttf
After rename "zawgyit.ttf" to those "names", you have to copy/replace to system/fonts/ folder.
၁၀.ဖုိင္ေတြလဲျပီးသြားရင္ Unpack/Repack Tool ကို ျပန္သြားပါ။ နံပတ္ 5 ကိုႏွိပ္ျပီး Enter ေခါက္ပါ။ ေအာက္ကပံုလို Size of Image = ေနရာမွာ ကိုယ့္ System.img ရဲ ့Size ပမာဏကုိ bytes Unit တန္ဖိုးနဲ ့ရိုုက္ထည့္ေပးရမွာပါ။ ဥပမာ။ ။ကြ်န္ေတာ့နမူနာ system.img ရဲ ့Properties မွာပမာဏ 3221225472 bytes ရွိပါတယ္။
10.After that, turn back to your Tool cmd Windows and press "5" to repack system. It will ask you size of system.img as I shown in figure below. You have to copy/pase size of original system.img to the Tool cmd Windows.


11.And then press ENTER, press "Y" and ENTER. After all of this, Tool will repack a new system.img that you edited!!

12.You can find new system.img under Tool's folder "system_repack_finish/IMG/" folder. Now you can flash the new EDITED SYSTEM.img to you device.
စမ္းသပ္ျပီးမွ တင္ေပးျခင္းျဖစ္ပါတယ္။ Kata C2 MT6592(MT6580) ဖုန္းမွာ Android 6.0 Root မရတာနဲ ့ဒီနည္းလမ္းေလးနဲ ့ျမန္မာေဇာ္ဂ်ီထည့္သြင္းထားျပီးျဖစ္ပါတယ္။ အဆင္ေျပပါေစ။
This Method is TESTED and I've Done by this way on Kata_C2_MT6592(MT6580) smart phone.
"I'M NOT RESPONSIBLE FOR WHAT YOU HAVE DONE"
This comment has been removed by the author.
ReplyDeleteလန္းတယ္ဗ်ာ
ReplyDelete